Ecuador 2012 – Exploring off road on motorcycles and more
Sandwiched between Colombia and Peru, Ecuador is a small country, a bit smaller than Colorado for a comparison. Considering the land mass of the planet and what a tiny fraction of it Ecuador is, it is curious that I have been there four times since 2005. The first time was to visit the Galapagos, the second was for a wedding, the third was to help lead a photo tour, and most recently to experience a self guided dual sport adventure on motorcycles.
The common thread to every visit was my long time friend Jason. Jason is a certified gringo with blonde hair and blue eyes who has dual citizenship and speaks perfect Spanish. Our shared love of motorcycling, and dual sport riding in particular, was a big motivator when we discovered Ecuador Freedom Rentals in Quito. They rent cycles and specialize in arranging guided and self guided tours of this geographically diverse little country. I would not do such a tour alone or without someone fluent in the language. This adventure was meant to be!
This collection of images is another travel documentary with the emphasis on recording our experience rather than creating gallery grade images. About half of the images were taken with my iPhone 4s. The others were taken with my Sony NEX 7 system. The Sony is my concession to the harsh realities of travel and motorcycling in particular, and the need for a small, lightweight, camera system. I learned a costly lesson after hauling my big Canon and lenses on my last cycle adventure last summer on the CDR (Continental Divide Ride gallery). The NEX 7 did a fine job and was much easier to ride with. Neither is an equal to my Canon gear in terms of image quality but, the best camera is always the one that is with you.
Our adventure was much shorter in length and duration than the CDR experience… 600 miles vs 2100 and four days vs fourteen, but it was no less memorable. Each day was a couple of hours longer than I would have preferred and the roads were, in general, much worse. So fatigue was with us every day as we neared our hotel.
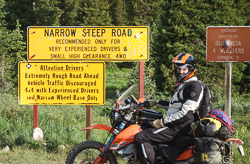
Our adventure started and ended in Quito, nestled in the Andes at 10,000 feet. Our course would take us down to the tropic climate and geography of the coastal regions and back up to the cooler and drier Andes several times. The villages we would pass through were often only separated by tens of miles, but the roads following the tortured contours of the chaotic mountains would be two or three times greater in distance. Sometimes we enjoyed a few miles of pavement and more miles of wide gravelly roads, but we spent a great deal of time on extremely narrow “two track” which could be very steep, very rocky, very potholed, very muddy, very foggy, or some combination of all of these. And yes, VERY remote. The first aid kit issued to us with our bikes included powerful injectable pain killers. Serious injury could take the better part of a day to reach treatment!
Throw in the maniacal country bus and truck drivers, loose livestock, blind turns, steep drop aways with no guard rails of any sort, and you had a riding experience that challenged us every second to stay alert and focused. Our survival demanded no less.
Yes, it was intense. Did we have a great time? Oh, yeah.
While in Ecuador I also got to spend time with Jason and Elizabeth, their new son Paul Andres, and to explore Guayaquil and Baños with them. Please visit my Ecuador 2012 gallery to see images of this latest adventure!
Note: While on the cycle adventure I created daily reports much like I did for the CDR Adventure. I have combined these into one PDF document that you may download here.
Photo Panoramas, a quick ‘how to guide’
My recent trek to Ecuador with Safari Party Adventures as a Photo Specialist gave me opportunities to try out the ‘panorama’ kit I picked up from Really Right Stuff just before I left. Since this was my third time visiting the Andes Mountains, I knew I was going to see some amazing vistas and I wanted to capture them as only a true panoramic image can.
The idea, of course, is to take a series of images that overlap and use the power of Photoshop or other specialized pano software to merge them together into one grand image file.
The ability of current software is impressive. I took a series of shots with a pocket camera some years ago with out a clue as to what I was doing and I got a pretty decent panorama of the mountains west of Milan, Italy.
Now I am better educated and I understand the benefits of careful camera control in creating good panoramic images. If your intended panorama composition has foreground details in addition to the usual background stuff then rotating the camera on the so called “nodal” point is critical. Rotating the camera around a point ahead or behind this point introduces parallax errors and the software can’t create a proper merge.
The nodal point is generally well forward of the camera’s sensor plane, so using the the mount hole on the camera base and rotating with your ball head will not produce good results.
This is easy to prove.
Set up your camera on a tripod reasonably level and with a “normal” focal length setting. Set up so that you have a vertical edge somewhere in the foreground and another farther away such that they can be lined up with each other in the center of your view in the eyepiece. Move the tripod left or right a bit if needed to get good alignment of your chosen verticals. Now, rotate the camera so that the two vertical edges are near either edge of your view. Hmmm… the two vertical edges no longer line up. That’s parallax.
With some trial and error, the pano gear lets you make the rotating point and the nodal point the same which keeps the foreground and background relationships in alignment. When achieved, merges result in perfect images without errors.
I did a fair amount of searching the ‘collective consciousness’ for nodal point information on my camera and lens combinations and was surprised that so little is published. For a given lens, body, and focal length (assuming a zoom), the nodal point is fairly predictable. At the bottom of this post I have listed the distance in millimeters from camera mount hole to the rotation point for a number of lenses and focal lengths. If you have the same gear there is no reason I am aware of why my offsets will not work just as well for you.
In addition to the above, the camera needs to be level and the actual rotating axis must be true vertical.
These special demands have generated a lot of mounting solutions from a variety of manufacturers, but since I had committed to the Really Right Stuff mounting system for my cameras and tripod I was by default rather inclined to go with their panorama gear. There is no downside to this… the RRS stuff is the best and second to none… except for the cost. It ain’t cheap, but it is gorgeous in every functional and visual way. (If you are ‘handy’ and a bit resourceful, a little googling will give ideas on making your own pano gear).


Once the camera and pano gear are all set for the vista you want to capture, you need to turn your attention to camera settings.
Essentially everything goes to manual. You don’t want the exposures and focus changing as you swing to a new part of the view. You won’t like the results and is nearly impossible to fix in post processing. So a short check list…
- Manual exposure. Check several parts of the anticipated pano and pick the best average exposure, making sure you don’t overexpose and lose highlights in any given part of the scene. Take a few test shots. Confirm you have the depth of field you desire.
- Manual focus and (for most lenses) IS (vibration reduction) off. Check focus. (… but it’s easy to forget!)
- Remote release is always best (especially if shutter speed is below 1/focal length seconds). Add mirror lockup if below 1/60.
- Set White Balance to something besides “Auto”, (try “Cloudy” or any other fixed setting).
Composition hints
Include more of the scene than you think you want on all four sides. The merged file will have scalloped edges and the corners will be pulled in. In the process of cropping the image to straight sides more will be cut away than you would think and you may not be able to get the final image you intended. I have found the best way to deal with this and keep the focal length I want is to shoot with the camera vertical. This means more individual images to get the panorama you want to capture, but the software is doing all the work so what’s a few more shots?
Overlap each shot with the previous by approximately a quarter. I changed my view screen in the 5D to the one with vertical and horizontal lines on it… a great aid for noting “targets” in the view. An object on the left hand line I set to the right hand line when I swing the camera. Any approximation is fine. I ignore the very nice engraved degree lines on the RRS pano head, but I could use them if I wanted to. (Who wants to count degrees when trying to capture an amazing scene?!)
Some folks have advocated shooting panos in jpg and / or at a reduced resolution if your camera offers it on the theory that you are combining images and will get lots of resolution in the final product. I, however, subscribe to the school of “don’t throw away good image data”. You may find later that one of the shots will make a nice image by itself. Also, I shoot RAW. Period. Shooting jpg is like taking off in a plane with less than full gas tanks. Why limit your options?
Yes, the merged image will be a big file. So what? You can make it any size you want in post processing.
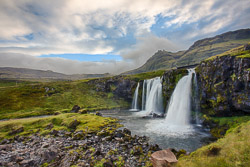
 Five images combined, volcanic lake, Quicocha Lagoon, Northern Ecuador
Click on image for larger view
Making panoramas is great fun and it will add a new perspective on how you view the world. Give it a try, (even without the panorama gear)… you might be surprised!
One last reminder… don’t forget to reset your camera to your “normal” settings after shooting your panoramas. It is very annoying to miss a great spontaneous shot later because the focus was still on manual, IS is off, and the mirror lock up is still engaged!
My Offsets for Canon 5D or 1Ds3 and the following Canon lenses:
17-40 @ 40mm, 132mm offset (OS)
24-105 @ 24mm, 110mm OS, @ 50mm, 105mm OS, @ 70mm, 80mm OS, @ 105mm, 50mm OS
70-200 @ 70mm, 47mm Os, @ 100mm, 5mm OS forward, @ 135mm, 16mm OS forward, @ 200mm, 4mm OS
Reflections on Ecuador 2008… Safari Party Adventures

Well, it’s been a little too long since my last post. The older I get the shorter the days get. Sorry about that. I am going to try creating shorter posts and do it more often.
Anyway, I am sitting in my friend Jason Murphy’s condo in Santo Domingo, Ecuador. We just finished up the Safari Party Adventure Ecuador Photo Trek, (see my old post) . By all accounts everyone had a good time and got some great photos. My role as “photo specialist” turned out to be highly rewarding as participants of various skill levels all worked very hard to improve their image capturing skills. And improve they did! It was great fun to watch and help. It kept me motivated to do my best as a shooter too.
I won’t be uploading any new Ecuador photos to my website gallery for a while, (posted here Jan ’08) as I am still exploring Ecuador, but I have put together a little “souvenir” slide show that includes a lot of “snaps” of the trip, and also some shots that will make it to the gallery later on. It is a 27 Mb Windows self-executing file and will take a few minutes to download on broadband. Save to someplace where you can find it, then double click on it to run it. It runs automatically, but if you move the mouse to the top of the screen various controls will appear should you wish to pause or advance images. It has music with it, so have your speakers on. No captions… sorry about that… just not enough time while on the road… but the images tell most of the story.
Ecuador Eco – Photo Tour August 2008
I need to confess up front to those of you who don’t know me personally that this post is going to sound a bit like a sales pitch. When I finished the draft and re-read it the next day I realized it had maybe a little too much hype. So, let me be clear before you get to the rest… it’s not hype… I am just plain excited about going back to Ecuador and putting my camera and imagination back to work!
My last trip to Ecuador in October actually had two missions. The first was to photograph the wedding of my friends Jason and Tania Murphy in Santo Domingo, Ecuador. Jason is a remarkable guy who grew up in Upstate New York and is not afraid to take the path ‘less beaten’ in his life choices. His wife Tania is from Ecuador and they are building a life and business that bridges the two countries and cultures.
Friend and fellow photographer Sandy Morris of Safari Party Adventures has had an Ecuador tour on his ‘short’ list for a long time. When we all came together we realized the potential for a fabulous trip was immediately in the offing.
So, my second mission on the October trip was to explore Ecuador with Jason and Sandy scouting out great photo locations for documenting the people, culture, and the amazing environmental diversity for which Ecuador is so well known. And, of course, we wanted to identify the very best accommodations to make a great trip unforgettable.
The result of that scouting trip is a unique tour planned for August 9-20, 2008. Jason’s website, Pro-Ecuador.com is hosting this memorable adventure organized by Safari Party Adventures. I am very pleased and excited to have been invited to join the tour as a “photo specialist” support person. What that means is you don’t have to be an expert photographer to join and appreciate this tour. In fact, you don’t have to be a “photographer” at all, but a great deal of effort has been put into making sure that the places we visit will have great photo potential and that we will not be rushing around on a minute by minute schedule. It takes time to make great images and this tour will provide both the time, the opportunities, and the help and advice you may need to capture photos you will be proud to show off when you get home. It doesn’t matter if you are shooting with a simple point and shoot or have the latest in DSLR gear, you will fit in.
I have marvelous images taken in Quito’s “Old City”. The beautiful old European influenced architecture is every combination of lines, colors, textures, and patterns you can imagine. Throw in the bustle of people coming and going, playing and working and you have the mix for photo magic.
A real ‘high’ on this trip will be at the hot springs resort, Papallacta, nestled between towering Andes peaks at nearly 11,000 feet. There are miles of trails with hundreds of species of birds and plants. At that altitude you have to pace yourself a bit, but that’s OK because who wants to run through a visual feast? When the clouds part on the horizon, we may get a peek at one of the many volcanoes dotting the Andes ranges. A good soaking in the hot springs after a long trek will be the reward for the days’ effort, (not to mention the images in your camera).
This will all be in stark contrast to the subtropical forests when we head West towards the coast. A land of contrasts… spare batteries will be essential for your camera to keep up!
Combine that with beautiful, amazing and intimate world class resorts and cuisine and you have a trip I guarantee you will be talking about for a long time afterwards.
Safari Party Adventures and Pro-Ecuador.com have worked very hard to make this trip a great value. Click here to read about the complete itinerary and to reserve your place. You will find more photos from my past visits to Ecuador there and be sure check out the Ecuador related albums at my Imagesbypyarnall.com gallery if you haven’t visited before. There’s also a link at the top of the page.
I will be posting more on this upcoming trip to make suggestions on equipment and other preparations. Don’t hesitate to call or write me directly if you need answers to photo related questions you may have about the trip.
Personally, I can’t wait to get back! Join me… it’ going to be awesome!
Click here for more tour information.
Click here to get to the main page of my blog