Photo Panoramas, a quick ‘how to guide’
My recent trek to Ecuador with Safari Party Adventures as a Photo Specialist gave me opportunities to try out the ‘panorama’ kit I picked up from Really Right Stuff just before I left. Since this was my third time visiting the Andes Mountains, I knew I was going to see some amazing vistas and I wanted to capture them as only a true panoramic image can.
The idea, of course, is to take a series of images that overlap and use the power of Photoshop or other specialized pano software to merge them together into one grand image file.
The ability of current software is impressive. I took a series of shots with a pocket camera some years ago with out a clue as to what I was doing and I got a pretty decent panorama of the mountains west of Milan, Italy.
Now I am better educated and I understand the benefits of careful camera control in creating good panoramic images. If your intended panorama composition has foreground details in addition to the usual background stuff then rotating the camera on the so called “nodal” point is critical. Rotating the camera around a point ahead or behind this point introduces parallax errors and the software can’t create a proper merge.
The nodal point is generally well forward of the camera’s sensor plane, so using the the mount hole on the camera base and rotating with your ball head will not produce good results.
This is easy to prove.
Set up your camera on a tripod reasonably level and with a “normal” focal length setting. Set up so that you have a vertical edge somewhere in the foreground and another farther away such that they can be lined up with each other in the center of your view in the eyepiece. Move the tripod left or right a bit if needed to get good alignment of your chosen verticals. Now, rotate the camera so that the two vertical edges are near either edge of your view. Hmmm… the two vertical edges no longer line up. That’s parallax.
With some trial and error, the pano gear lets you make the rotating point and the nodal point the same which keeps the foreground and background relationships in alignment. When achieved, merges result in perfect images without errors.
I did a fair amount of searching the ‘collective consciousness’ for nodal point information on my camera and lens combinations and was surprised that so little is published. For a given lens, body, and focal length (assuming a zoom), the nodal point is fairly predictable. At the bottom of this post I have listed the distance in millimeters from camera mount hole to the rotation point for a number of lenses and focal lengths. If you have the same gear there is no reason I am aware of why my offsets will not work just as well for you.
In addition to the above, the camera needs to be level and the actual rotating axis must be true vertical.
These special demands have generated a lot of mounting solutions from a variety of manufacturers, but since I had committed to the Really Right Stuff mounting system for my cameras and tripod I was by default rather inclined to go with their panorama gear. There is no downside to this… the RRS stuff is the best and second to none… except for the cost. It ain’t cheap, but it is gorgeous in every functional and visual way. (If you are ‘handy’ and a bit resourceful, a little googling will give ideas on making your own pano gear).


Once the camera and pano gear are all set for the vista you want to capture, you need to turn your attention to camera settings.
Essentially everything goes to manual. You don’t want the exposures and focus changing as you swing to a new part of the view. You won’t like the results and is nearly impossible to fix in post processing. So a short check list…
- Manual exposure. Check several parts of the anticipated pano and pick the best average exposure, making sure you don’t overexpose and lose highlights in any given part of the scene. Take a few test shots. Confirm you have the depth of field you desire.
- Manual focus and (for most lenses) IS (vibration reduction) off. Check focus. (… but it’s easy to forget!)
- Remote release is always best (especially if shutter speed is below 1/focal length seconds). Add mirror lockup if below 1/60.
- Set White Balance to something besides “Auto”, (try “Cloudy” or any other fixed setting).
Composition hints
Include more of the scene than you think you want on all four sides. The merged file will have scalloped edges and the corners will be pulled in. In the process of cropping the image to straight sides more will be cut away than you would think and you may not be able to get the final image you intended. I have found the best way to deal with this and keep the focal length I want is to shoot with the camera vertical. This means more individual images to get the panorama you want to capture, but the software is doing all the work so what’s a few more shots?
Overlap each shot with the previous by approximately a quarter. I changed my view screen in the 5D to the one with vertical and horizontal lines on it… a great aid for noting “targets” in the view. An object on the left hand line I set to the right hand line when I swing the camera. Any approximation is fine. I ignore the very nice engraved degree lines on the RRS pano head, but I could use them if I wanted to. (Who wants to count degrees when trying to capture an amazing scene?!)
Some folks have advocated shooting panos in jpg and / or at a reduced resolution if your camera offers it on the theory that you are combining images and will get lots of resolution in the final product. I, however, subscribe to the school of “don’t throw away good image data”. You may find later that one of the shots will make a nice image by itself. Also, I shoot RAW. Period. Shooting jpg is like taking off in a plane with less than full gas tanks. Why limit your options?
Yes, the merged image will be a big file. So what? You can make it any size you want in post processing.
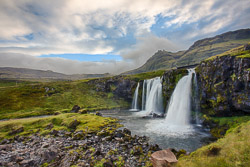
 Five images combined, volcanic lake, Quicocha Lagoon, Northern Ecuador
Click on image for larger view
Making panoramas is great fun and it will add a new perspective on how you view the world. Give it a try, (even without the panorama gear)… you might be surprised!
One last reminder… don’t forget to reset your camera to your “normal” settings after shooting your panoramas. It is very annoying to miss a great spontaneous shot later because the focus was still on manual, IS is off, and the mirror lock up is still engaged!
My Offsets for Canon 5D or 1Ds3 and the following Canon lenses:
17-40 @ 40mm, 132mm offset (OS)
24-105 @ 24mm, 110mm OS, @ 50mm, 105mm OS, @ 70mm, 80mm OS, @ 105mm, 50mm OS
70-200 @ 70mm, 47mm Os, @ 100mm, 5mm OS forward, @ 135mm, 16mm OS forward, @ 200mm, 4mm OS
Reflections on Ecuador 2008… Safari Party Adventures

Well, it’s been a little too long since my last post. The older I get the shorter the days get. Sorry about that. I am going to try creating shorter posts and do it more often.
Anyway, I am sitting in my friend Jason Murphy’s condo in Santo Domingo, Ecuador. We just finished up the Safari Party Adventure Ecuador Photo Trek, (see my old post) . By all accounts everyone had a good time and got some great photos. My role as “photo specialist” turned out to be highly rewarding as participants of various skill levels all worked very hard to improve their image capturing skills. And improve they did! It was great fun to watch and help. It kept me motivated to do my best as a shooter too.
I won’t be uploading any new Ecuador photos to my website gallery for a while, (posted here Jan ’08) as I am still exploring Ecuador, but I have put together a little “souvenir” slide show that includes a lot of “snaps” of the trip, and also some shots that will make it to the gallery later on. It is a 27 Mb Windows self-executing file and will take a few minutes to download on broadband. Save to someplace where you can find it, then double click on it to run it. It runs automatically, but if you move the mouse to the top of the screen various controls will appear should you wish to pause or advance images. It has music with it, so have your speakers on. No captions… sorry about that… just not enough time while on the road… but the images tell most of the story.
Travel Photographer or Beast of Burden?
As a boy who grew up playing in the nearby woods and fields, it should come as no surprise that I became a Boy Scout. The one thing about scouting that really was a fit for me was captured in one of their mottos… “always be prepared”. It is nearly a half century later, and I still try to live by that motto. However, as a photographer who has managed to accumulate several bodies, many lenses, tripods and a long list of accessories, this philosophy has led me to an aching back on many trips.
In April I trekked around the spectacular American Southwest taking photos. One memorable day was spent at Zion National Park where we chose to venture up to Angels Landing. This is a 1500′ vertical climb in about 2.5 miles. As usual I had my LowePro Vertex 200 photo backpack and tripod. WHAT WAS I THINKING? I definitely did not need my 100-400 or the flash head. With a half mile behind us one of the twenty something members of the group took pity on me and volunteered to carry my pack. “Well”, I said… “if you insist”. By the time we completed that climb up and back my 35 pound pack took most of the starch out of my young friend. “Better him than me”, I thought to myself… “he’ll recover in a few hours”. Ok… lesson learned… one can be OVERprepared.
I had a similar weight related problem checking bags at the airport on a different trip. I cut the margins too close and was over the 20 Kg limit. (I blame my old heavy tripod). The resulting stress of opening the bag to pick out a pound or two of whatever to get back under the limit along with the glares from other travelers waiting behind me was another ‘last straw’. “Never again”, I told myself. I bought a digital luggage scale from eBay for less than $20 (search “luggage scale” and take your pick). Now I weigh everything and know precisely what weights I am dealing with.
For those of you who will be joining me on the upcoming Pro-Ecuador – Safari Party Ecuador Photo tour, this is my way of backing into the subjects of, “what do I need for this trip without becoming a beast of burden?”. We can be prepared for nearly any photo situation and have the proper attire for weather and social situations by being smart about our choices to minimize weight and bulk. (Note: There are still a few openings left for this great photo adventure, go here or feel free to e-mail me directly and we can arrange to use that other great invention, the telephone.)
Since this is about preparing for a photo tour, let’s start with the photo gear.
There are really two aspects to the issue of how much to bring. One obvious limit is staying under the airline requirements for carry on. The other is deciding how much you can manage on an everyday basis while out shooting. An option here is to consider bringing a second smaller belt or shoulder bag (stuffed into your checked luggage) which you use to carry only what you need for any given outing. With the possible exception of your tripod and miscellaneous stuff, your camera and lenses must be with you at all times during the air travel phase so that means whatever bag you choose must fit in the overhead or under the seat in front of you. My well traveled LowePro Photo Trekker AW would fit in either location carrying a 20D or 5D and three lenses. Admittedly, this is a squeeze for under the seat, but doable. Now I am sporting the LowePro Vertex 200 as it can safely carry my laptop and is better able to handle the tall 1Ds body, BUT, it is an ‘overhead’ bag only. Under the seat is not an option. My second carry on is a soft bag that I use for the laptop after reaching my destination, and a bunch of the other miscellaneous stuff most of us take with us. Check manufacturer’s websites for dimensions and overhead compatibility.

Gear wise, this is what I consider “essential” for good photos in a variety of situations. (A quick note here… if you are shooting an advanced “point and shoot” or a digital with a non removable lens, much of what follows won’t apply… you can decide what is relevant).
Tripod
If you haven’t bought one yet, spend as much as you can possibly afford, then spend a few bucks more. The lightest and strongest are carbon fiber. Get the best ball head you can manage as well. This link covers the subject quite well.
Cable Release
Good landscape exposures require a steady camera, which means a good tripod (see above) and not touching the camera during exposure. A cable release, (they were cables in the ‘old’ days, now they are essentially a switch on a long wire), means you don’t have to touch the camera to take the shot. This becomes super critical for long exposures. Some of the most exciting photography starts at sundown and goes well after dark. You need a cable release for these shots. They are cheap… check eBay for knock offs, though the factory units are usually better quality. If your camera doesn’t support an external release, learn how to use the timer virtually every camera has, or the wireless remote if your camera comes with one.
Lenses
This is where the pounds and dollars can add up, although the new generation of wide range zooms is quite amazing both in value and size. The ideal is to cover the range of focal lengths from wide to telephoto with a minimum number of lenses. In 35mm film parlance, a focal length of 50mm is “normal”, (the perspective of your unaided eye), 16mm is “wide”, 100mm is a mild telephoto, 200-300 is telephoto, and so on. Personally, I am waiting for the 15-600mm F1.4 stabilized super lens. It is made of Unobtanium and costs infinite dollars. It will be released as soon as the laws of physics are revised a bit. Since most of you are shooting with sensors that are smaller than 35mm film you multiply the lens length by a ‘factor’, typically about 1.6, to get the ‘effective’ focal length. A good “walk around lens” for sub full frame sensor cameras is something like a 17-85mm or slightly longer, (24-105mm full frame). If landscapes excite you, then a wide angle is highly desirable. There are now 10-17mm that get the full frame equivalent of 17-24mm. This is a real ‘work horse’ focal length. For various wildlife shots a telephoto that can reach 200-300 is the ticket. If you want greater reach, consider a “tele-extender”. A 1.4X will cost you an F stop in exposure but add half again to your telephoto focal length. They are only about an inch and a half long and weigh very little. If you don’t want to miss possible macro shots, consider a set of “extension tubes”. These go between the camera and lens but have no active glass in them (as the tele-extenders do). A cheap set is less than $100 and will give very good results with your walk around or telephoto lens. In this scenario you might have three lenses which fully cover from wide angle to telephoto. You could easily get away with two lenses if you have one of the new generation wide range zooms, but none of these do justice to wide angle needs. If your budget is already strained and new lenses are not in the program, don’t worry about it. Bring what you have. If you come upon a scene that begs for the wide angle you don’t have yet, you may be able to ‘cheat’ and take a series of overlapping images that get stitched together in post processing. You won’t have the great depth of field wide angles are noted for, but you will get ‘the big picture’.
Filters
A lot of shooters now assume they can get whatever effect they want through the magic tricks in PhotoShop, and there surely is quite a lot of magic in there, but there are still things better (or only ) done at the camera. Two filters I use often are a circular polarizer and a neutral density (fixed or variable). Polarizers are often abused by way of “too much of a good thing”, but they are wonderful for dealing with reflective surfaces (water) and richening up a blue sky. Neutral density filters allow you to use long shutter exposures in full light. Want to make a waterfall look smooth and milky in broad daylight? You need a neutral density filter to do that. The best one is the Vari-ND by Singh… you can dial in the f stop reduction you want from about 1.5 to 8. Very cool, but it is also expensive. (They could use some competition). The fixed ND filters are more affordable. What ever you decide, when buying filters, size it to the largest lens you have and get reducer rings for a few bucks each to allow matching up to your smaller lenses.
Batteries
You need at least one spare camera battery and don’t forget the charger. Electric power and outlets in Ecuador are the same as the US, so no problem there. If you are bringing a “bunch” of batteries and they happen to be Lithium-ion, check out one of my earlier blogs on that subject. The FAA has new rules regarding these, but in practical terms it is not an issue for most of us.
Memory Cards
There is no one answer here that fits everyone, but cutting to the chase, here is the concept. Ideally you want to have three copies of every image when you are heading back home. One set goes in checked luggage, one set stays with your camera gear, and another set goes in a separate bag or is carried by a traveling companion. If three is too hard to pull off due to limitations in equipment, then at least two copies. Bad things can happen to good images. There are numerous strategies to pull this off. Not too long ago memory cards were expensive, so we downloaded our images to other media and recycled our cards. Times change, gas now costs a fortune, but memory is almost dirt cheap. One strategy is to buy enough memory so that you don’t have to reuse them during the course of the trip. How much memory is enough? How many images are you going to take? Do you shoot RAW or just jpg or both at the same time? Obviously it’s impossible to know for sure what you will need, but you can do some estimating. Put an empty card in your camera. Set it to max quality jpg and note the image counter. Set the camera to RAW and do the same thing. With my Canon 5D and a 2 gig card I can get 366 jpg or 121 RAW images. Big difference, but I shoot almost exclusively RAW so that is what I use for calculating. We won’t be shooting every second of every day, but based on my experience, it is easy (and ‘normal’) to shoot several hundred images a day on average. Most of them may never see the light of day again, but the idea is to take them and then decide what to keep back in front of your monitor at home. Again your mileage will vary based on your camera and shooting style, but having 20 gig of card memory is by no means overkill if you have a 10-12 mega pixel camera.
Image Backup
What is the best way to backup images? Again it depends. If you are traveling with a laptop, its hard drive will serve as one backup, assuming you have 30+ gigs of free space. The laptop then offers several other options. One is burning CDs or DVDs and the other is bringing a small (60 gig or larger) external hard drive. That actually gets you four copies if not recycling your cards and qualifies as overkill. I recycle my cards but use the laptop, DVDs and an external drive. If you are not traveling with a laptop, there are quite a number of small portable stand alone drives that have built-in card reader capability. Some like the Epson P3000, also have a built in high quality screen which allows reviewing or showing off your images. These are pricey, but very nice. The versions without screens are much more affordable. Having enough cards to last the trip and a card reading back up drive is the simplest approach to a two copy backup strategy.
Since I always travel with a laptop you may be thinking, “Maybe I can use Paul’s laptop to backup”? Well, nothing personal, but short of an emergency that is not an option. Given my limited storage, card read times, and the fact that my 1Ds creates humongous files, it simply isn’t practical. Then there is the responsibility of protecting the precious shots of someone else. Who needs the stress?
Other Stuff
For those of you who don’t know me, my middle name should be “Gadget”. For travel work I like to “geotag” my images. Geotagging is adding the Lat – Long position data of the image location directly into the metadata of the file. I bring my Garmin 60CSx GPS to do that (and give me a track to retrace my steps if needed). Remember that all these electronic toys need batteries, chargers, cables, ad nausea. Don’t forget a good lens cleaning cloth and fluid. The best is ROR by V-Max Products. Put it in your checked luggage so you don’t get hassled at security. A small LED flashlight is essential for night photography. There are some cute ones out there that don’t use batteries… you crank the hell out of them and they provide good light for a surprising amount of time. Make a checklist now and review it several times before departure.

Clothes and Luggage
Some of you are probably experienced travelers, but perhaps this is your first out of country adventure. Trust me on this… you will hate yourself if you have more than one checked bag by the end of the trip. Schlepping multiple bags around airports and hotels gets real old, quick. A personal bag, your camera bag or pack, and one medium size bag on wheels is the ideal. You want to be able to manage all your stuff by yourself. Use the smallest bag that will fit your essentials, but it you are thinking about packing your tripod in it, make sure the body of the bag is long enough for it to fit. You might have to remove the ball head. One can normally manage a folded tripod as part of your carry on by removing it from the pack before stowing overhead, but I usually pack mine in checked luggage so I don’t have to deal with the added weight on the camera pack or the extra hassle of detaching and stowing while other travelers are boarding the aircraft.
After packing the tripod, battery chargers, cords, etc., is there any room left for clothes? Absolutely! Synthetics, or more specifically the various polypropylene blends that are now very popular. I resisted them for a long time, but now I am a true believer. Check out REI.com or LL Bean. There are now dozens of super lightweight, moisture wicking, quick drying and smart looking clothes for the adventure traveler. Pants with zippered legs can also serve as shorts. I stay with long sleeved shirts to deal with the sun. T shirts, undies, and socks, … all are available now in synthetics. . A quick rinse in the sink and they are dry in short order. Three of each are all you need. The reduction in weight and bulk is amazing. Any sporting goods store also carries a huge variety. With some careful shopping the extra cost is not very much. For the Ecuador itinerary virtually all meals and other social situations will be strictly casual. Nothing fancy required.
We will be doing some walking everyday so good comfortable footwear is in order, but even the hiking will be easy. Serious hiking boots are certainly not required and they take up a lot of room in your bag when you are not wearing them.
A rain jacket of some sort is advised even though we won’t be there in the rainy season. It can serve as a wind breaker and with a light sweater or fleece underneath you create the layers that work well for the possible cool evenings high in the Andes. There will be opportunities to swim or at least relax in the water, so a swim suit is a good idea.
As you can appreciate, I have only touched lightly on any one of the points mentioned here. By all means, e-mail me with questions, personal gear concerns or points you think I have over looked. There will be more posts from Sandy, Jason or myself before it is time to start packing, but start thinking about your gear now. Don’t wait until the last minute. “Be Prepared!”